MCNEILL'S TREE SERVICE
1-406-375-5624
the climbing arborist
As noted in our introduction, David McNeill, founder of McNeill’s Tree Service, has been working as a residential climbing arborist for over 50 years. He began this career as a teenager in the California Bay Area and gained valuable, on-the-job experience through his mentor and employer, Ed Hobbs.
Fifty years has seen a tremendous evolution in arboriculture. He has commented many times “if we only had these tools when I first started climbing!” This blog page will be a forum for his insights and opinions on the climbing process, working with trees in general, the innovative tools now available, as well as sharing random thoughts and observations gained in his long, and still active, career.
Please remember as you read these posts, these are his thoughts and opinions on what has worked for him. He readily admits people will be different. Not everyone will agree with his opinions as body size and shapes, climbing styles and personal preference, all play a part in what works for each individual. There is no one answer. We are simply hoping this information may help a new climber, or even an experienced one, looking for new insights and tips.

© 2020 McNeill’s Tree Service
The Life of a street tree

By: Sylvia McNeill © 2021 McNeill’s Tree Service
Talk about a tough life. Before I start on what could well end up being a rant, let me state: there are no trees “native” to the built environment.
When discussing the built environment, we are referring to anything and everything created by people. It is contrived and manipulated. The complete antithesis to where trees naturally grow. And yet we want, and indeed need, them in our proximity. If you doubt that, simply go someplace where there are no trees or plants whatsoever and then transport yourself to a place with them. If you prefer the area without, believe me, you are in the minority.
Our cities are “built environments”. To our credit, we keep trying to incorporate trees and plants within these areas to provide some kind of respite from the harsh concrete climate. Are we successful? According to some studies, not so much, suggesting the typical street tree mean life expectancy is 19-28 years. However, it is further suggested the tree population half-life is 13-20 years, meaning for every 100 trees planted, only half of those will make it to 13-20 years. (Roman 2014)
With all our modern technology and innovations, we are having a hard time achieving longevity in our street trees within urban areas compared to cities of the past. Here in our area of Montana, some of our cities have street trees that are over 80 years old, some even older. But as they decline and have to be removed, their replacements are having a hard time establishing and surviving. So, what gives?
Modern cities are far different than cities of the past. In the past, streets tended to be wider and unpaved. Rainfall would be absorbed by the entire street area and any tree planted near that street would likely be able to access that water.
Streets now are paved where storm water drains may be designed to bypass roots. One of the many ecosystem benefits touted for trees is their ability to mitigate storm water runoff…if it is channeled away from their roots, how are they to perform this job?
There are often paved sidewalks on one side of a tree with the parking area and adjacent street on the other side, again all paved. These areas between the sidewalk and street, often referred to as boulevards, may be very narrow or very wide. Trees fortunate enough to be planted in wide boulevards have a much better chance of survival. The caveat here is “if the quality of soil is sufficient to their needs”.

The quality of soil in boulevards can vary from not bad to really awful. With the construction of surrounding infrastructure and housing, all manners of debris may be buried in this area. This may include concrete, building debris, contaminants – basically anything that needed disposed of during construction could have been tossed here. It may be rocky, it may be silty. It may be seriously compacted, which restricts root growth and water drainage.
Trees planted in the narrower boulevards are subject to conflicts with the sidewalk and streets as their roots grow. As sidewalks require repair, roots are often cut to the detriment of water uptake or even stability of the tree itself.


Another challenge experienced by city street trees is the pruning required to keep them above vehicle and pedestrian traffic. Merchants do not like their signage blocked and it is important to keep trees from blocking clear view triangles on street corners to ensure public safety.
Please remember, the trees did not plant themselves. Very few are volunteers in these areas. It is up to the people who plant them to select a species that is hardy enough to have a reasonable chance of survival in the site selected, that the site is actually suitable for a tree at all (some sites simply should not be planted), to ensure the tree has the potential structure to minimize pruning needs (which is a factor not only in health of the tree but expense for management), to ensure planting is done correctly and that after care is prearranged and committed. These last two conditions are the most common reasons why trees do not survive the establishment period for any area, let alone for the challenges faced by street tree selections.
Additional challenges include damage by vehicles, vandalism, and extreme weather conditions enhanced by the infrastructure around them. I often think trees survive in spite of us, not because of us.


We need to work on being better stewards because we need trees. There is no need to quantify “ecosystem benefits”. All you have to do is remember without plants, we (humans) would not exist.
References: Roman, Lara A. (2014) How Many Trees Are Enough? Tree Death and the Urban Canopy. Scenario 04: Building the Urban Forest
harvesting and redirecting rain water

By: Sylvia McNeill © 2021 McNeill’s Tree Service
Living in an area of limited rainfall and still desiring to have some vegetative growth is often challenging. Whereas I do recommend planting reasonably for your area, making use of rain water is a great way to augment irrigation for landscape plants and trees. This may not allow a tropical aspect or thick English garden design, but it certainly may expand what is possible.
An inch of rain produces approximately .623 inches of water per square foot surface. Therefore, a 1000 sq ft roof can gather 623 gallons of water per inch of rain. That’s significant.
Two common terms used for rain water collection are harvesting and redirecting. Harvesting is where you collect the water in a container of some sort to be used later. Redirecting is literally directing it to an area to be used at that time.
Harvesting depends on the ability to set up receptacles in strategic areas and may be somewhat problematical on the size of the container vs the amount of rainfall. Being able to collect the rain water and use during dry spells, though, is wonderful if you can manage it.
The simplest method may be redirecting gutters. Instead of simply letting the water flow out of a gutter close to a house, additional piping can be added to channel that water to an area that can absorb the water for plant use. Every roof surface on our property has gutters that are redirected to planted areas. (Ok, full disclosure, my garden shed still needs its gutters but they are coming this year.)

The photo above shows the gutter coming off the east roof of the horse barn being piped into the center of this grove. They receive half of this roof as the other half goes to a mountain ash and blackberry patch on the north side of the barn. This grove was watered prior to installation of this gutter.
The grass areas are never watered, receiving natural precipitation only. When the rains dry up, so does the grass. It goes dormant and greens up upon receiving what nature allows.

The oak tree in the photo below received augmented water during establishment and dry spells. It was planted as a liner off site in 2010, moved here in late 2011 or early 2012. In 2016, it received its own dedicated gutter from the lower deck roofing on the east side of house (left side in photo). The upper house roof goes to honeylocust on the south side of the house. The full west side of the house (right in this photo) goes to the three ash trees.

As you can see in these photos, we use an abundance of mulch. It helps immensely if you have a mulched area around your plants as it will absorb and hold the water much longer than bare, mineral soil. As the mulch breaks down, it enhances the soil in many ways as well as adding plant available nutrients. We use whole tree chips. And, yes, that is easy for me to say since this is a by-product of our business. However, chances are there are companies in your area that supply whole tree chips for varying prices.
A side comment: We have received calls from people requesting chips saying they would “let us” dump chips at their place to save us money on dump fees. My suggestion would be to not start off the conversation in that manner as some areas don’t have to pay to dump chips. We don’t because there are already so many people who want them, we have never had to take chips to a landfill. Large companies in urban areas may well have to pay dump fees. Best to contact a company and simply ask what their policy is for delivering chips.
Back to water collection. Check out your state’s limitations on water harvesting, if any, to be sure you are compliant. Many states encourage this practice, but there are some states that have restrictions or limitations. These may range from how much water you can collect, to the use you make of it. Googling collecting rainwater will bring up websites with information on restrictions or conditions for the various states.
CLIMBING ROPES

By: Sylvia McNeill © 2021 McNeill’s Tree Service
This blog introduces the Samson 11.8 mm Tangent Climbing Rope as David’s new preferred ‘go to’ climbing rope. For those of you who may be reading your first post here, David is David McNeill, owner and climber at McNeill’s Tree Service.
Over the years, David has seen tremendous development and evolution in this essential component for professional tree climbing and, consequently, has used many different types of ropes. As with all tools in our industry, anything and everything you can do or use to make a job easier and safer is well worth considering. In the end, the final choice comes down to personal preference and ‘what works for you’.
Our industry standards give specifications denoting suitable rope characteristics for arborist climbing lines. These include what materials they should be constructed from, minimum breaking strength, maximum working elongation, and minimum diameter. The manufacturer of the rope shall identify the rope as being suitable for tree climbing. There are also specifications for knots, loops and hitches. For specific information I refer you to the ANSI Z133 2017 Safety Requirements for Arboricultural Operations which can be found on Tree Care Industry Association’s website, our national tree care association.
Specific criteria David looks for in a rope are knot-ability, is the rope soft and pliable enough to be easy to tie and hold the knot securely; strength, can it handle the job at hand; weight, remember you are lugging this rope around with you through the tree – at the end of the day, ounces add up; visibility, you HAVE to be able to see your rope readily ALL the time. What color that translates to is going to depend on your work environment, climate and even your eyesight. What is highly visible to one person may not be to another. Be advised, this is NOT a super static rope as is preferred by many stationary rope technique climbers today. David prefers some give in his ropes.

In the link provided to Treestuff.com above you will see a brief write up. It states this rope is designed for modern arborists referencing compatibility with SRT, Stationary Rope Technique, climbing that fits perfectly with mechanical devices. This is David’s preferred climbing method. Stationary Rope System (SRS) – Techniques and Tips. I found the comment regarding how suitable it is for footlocking rather interesting right after saying this rope was designed for modern arborists. Footlocking was originally used as a technique for canopy access and movement within the tree. Today that job is more often accomplished by foot and knee ascenders. This suitability illustrates the versatility of this rope.
All ropes have idiosyncrasies that may make it the perfect choice for one application and, perhaps, totally unsuitable for another. Pay attention to all information supplied as well as specific nuances that make it suitable, or unsuitable, for your application in order to make an informed choice. For example, it is important to note Samson does not recommend having two splices put on this rope due to rope milking issues.
protos integral helmets

A product review of the Protos Integral Helmets with SENA SMH10 Headsets
By: Sylvia McNeill
Having used KASK arborist helmets for the past four years or so, David and I decided to try the Protos Integral helmets to, hopefully, improve comfort. These helmets have some unique features we found intriguing. The most enticing of which was the incorporation of eyeglasses integral to the helmet. We both have suffered the discomfort and pain caused by a day of working with safety glasses where the ear pieces become embedded into your head by the pressure from the earmuffs connected to the helmet. However, safety glasses are not optional in our opinion and, in my case, prescription glasses are also mandatory in order to see.
The Protos helmets offer safety-rated glasses in a variety of shades from clear to various tints that affix to the helmet harness by snapping in. I will interject here…it is NOT easy to snap them in! The first picture below shows the glasses attached in the helmet while the second picture shows a closeup of the adjustment bar which you can pull out or push in depending how close you want them to your face. I am assuming/hoping that with use, it will become a bit easier. Fortunately, it is not something you do multiple times a day as generally you know if it is going to stay cloudy or sunny.


What really sold me on trying this helmet was the optical insert whereby you can have your prescription lens installed. This is then attached via the nose guard to the safety-rated glasses integral to the helmet. The picture below shows the insert by itself. You can see how it attaches to the safety glasses in the top photo above.

While this combo eliminates the pain from the earpieces, I am finding it a bit difficult to adjust to the small field of vision offered in the insert. (I have astigmatism in one eye.) I haven’t compared notes with anyone else using this feature and so do not have a comparison or feedback on possible adjustment suggestions. Still working on it.
In addition to being adjustable for distance from your face, these glasses tilt as well. The plus side with a little further away from your face is they don’t fog up; however, this can allow small particles to invade that space. (You can actually see debris within the helmet in these photos.) We currently just have the mesh face guards and I am obsessive about using this feature while chipping and the vast majority of time while using a chainsaw. Getting slapped in the face by brush is no fun and drifting sawdust is more than a nuisance to your eyes. A clear, solid plastic shield is available and we may try that option.
The ear protectors are a huge improvement over our previous helmets. When not in use, they slide up inside the helmet for a tidy, sleek carriage while sitting comfortably against your head. (Below left) When in use, without eyeglass earpieces, they seat snugly to your ear providing the noise protection they are designed to give. (Below right)


David had no trouble adjusting his helmet to his satisfaction and finds the overall fit very comfortable. I am still working on fine-tuning the tension in the harness for optimum comfort. As the ground crew, I am bending over constantly throughout the day, so tight but not too tight, is a delicate balance. The harness does not have an infinite adjustment, as the KASK does, but rather little holes in the plastic connectors that are a pain to adjust. You have to take the helmet off and the snap-in holes are a bit stiff as is pulling out or pushing in of the harness. (See photo below)

The chin strap…I will admit, I am not thrilled with it. It is a little magnetic latch that I can’t feel through gloves. Not a big deal to take off the gloves, I realize that, but it is another step to go through. I also have to remind myself to study what the latch looks like before I put it on so my hands will recognize it when they encounter it. David really likes it. Maybe I am just more resistive to change… (See sequence below)


David and I have been using communication devices for years now. After trying sets designed specifically for tree work, that were outrageously priced in my humble opinion and underperformed shockingly, David looked into the SENA brand that actually is designed for motorcycle helmets. WHAT an improvement and at a fraction of the cost. We used the SENA SMH10R headsets on the KASK helmets. As we did not want to completely decommission those helmets with their headsets, we purchased the SENA SMH10 for the Protos. Again, another huge improvement. VERY pleased with their performance. Crystal clear communication, able to hear each other over the chipper, no static even with a building in between us (as in one of us in the front yard, the other in the back).
The battery and controls for these units are bigger and bulkier than the previous sets. We have them mounted on the back of the helmet and it is remarkably easy to bump them on branches which readily turns them off. But constantly running into branches does turn them back on again. The button to initially turn them on (and back off at the end of the day) is a little tiny button (you can barely see it in the photo below on the right side of the jog dial visible with yellow behind it) you push with your right hand (in our configuration) while pushing down on the middle of the big bulb. (Yes, I am still getting used to that; I have a slow learning curve.) The jog dial also controls the volume. Since it is big, it is nice and easy to adjust even with gloves on.

While you or your co-worker are careening through a brushy environment, you become aware of a magnified scraping sound. The first time I heard David’s close encounter, I quickly looked up to be sure nothing was amiss. You do get used to those sound effects pretty readily and I remain unconcerned if not accompanied by major swearing or yells.
Personally, I feel anyone in tree work not taking advantage of communication devices is missing out on a big safety factor. Hand signals presume everyone is staring at everyone else constantly, which is unrealistic to say the least. Yelling at each other also doesn’t cut it as most of us are wearing ear protection due to running chainsaws or chippers or being in close proximity to them.
I have heard comments made by people who don’t like the communication devices because they don’t want to listen to the crew jabbering all day. Hmmm, I will make a couple of comments about that. First, you are at work. Your main focus of attention should be on the job at hand. “Chit chat” should be relegated to lunch time and breaks. Second, while you are working you need to focus on safety and getting the job done well and efficiently. If you are the ground crew, you need to be aware of what is going on above you as well as being prepared to assist your climber, or other crew members, as needed. If you are the climber you need to be aware of what is going on under you as well as within the tree. In my humble opinion, excessive chatting, talking on your cell phone, listening to music instead of paying attention to the job at hand are not acceptable work practices. But again, that is only my opinion.
All-in-all, we are very pleased with the overall performance of the Protos Integral helmets with the SENA SMH10 headsets.
We purchased these helmets and the headsets from Treestuff.com. I am providing a link to their site. We do not receive any credit for this promotion. We simply are passing on information for obtaining these products from a company with which we have been very satisfied. https://www.treestuff.com/
Tie, Dress and set: The mechanics of successful knot tying
By Sylvia McNeill © 2020 McNeill’s Tree Service
Do your shoes stay tied? Or are you having to retie them throughout the day. This was a revelation to me after several years (yes, I am a slow learner) of noticing my husband’s shoes never came untied and mine always did. As a professional tree climber who spends his days relying on successfully tied ropes for safety, he takes tying knots, any knots, seriously. It has become a habit.
This is, perhaps, an under-rated skill. One which is taken for granted but one, if not mastered, literally can mean a climber’s life or a job gone horribly wrong as a secured branch or trunk section slips out of its trace causing damage to property or ground crew.
Those three steps: tie, dress and set; should be assiduously adhered to. Each of these steps is simply stated but may be not-quite-so-simple to achieve properly.
Tie: The mechanics of creating the knot. Be sure you understand exactly how the knot-of-choice is configured. Making a mistake at this step can mean the difference between a knot applicable for the task-at-hand or a disaster in the making. There are numerous on-line sources of knots and how to tie them. One example is Animated Knots.
Dress: Maneuvering the rope(s) into proper position within the knot. Take the time to carefully align the rope segments properly. This precision will enable the knot to be set properly.
Set: Once the knot has been created and aligned properly, then, and only then, should you tighten the rope(s) to hold the position.
Continue manipulating the knot until it looks exactly as it is supposed to and set to the desired firmness. The devil is in the details resulting in the difference between success or failure. And is the main reason why my shoes never stayed tied.

Shoe on left foot (right side of photo) will stay tied. Shoe on right foot (left side of photo) will come loose quickly.
STATIONARY ROPE SYSTEM (SRS) – Techniques and tips

By David McNeill © 2020 McNeill’s Tree Service
Previous blogs, Tools of the Trade and Stationary Rope System (SRS) Components itemized the tools I have found suitable for our jobs and my climbing style. In this blog, I would like to point out some of the idiosyncrasies that have made them my choice or contributed to when I use which one. There are always pros and cons with any system or tool. You will determine your own list. But here are some on mine.
Hitch Hiker 2 (HH2)

There are many desirable features which have made this tool my “go to” choice for an ascender aka multicender. These features include its indestructibility, reliability, compact size, and smooth operation on all ropes. In addition, it does not bend the rope to create friction. This last point is unique as all other multicenders bend the rope as part of their friction control.

Akimbo

Probably its best features are it is fast and easy-on/easy-off the rope and it is small and compact. The ability to take it off and on the rope quickly with no parts to drop or pins to pull is very desirable if the tree you are climbing requires multiple redirects. However, it is a bit fussier on the rope you choose. And whereas it is extremely “climbable”, you do have to pay more attention to tension and precision in use.
Some people have commented the Akimbo is a bit awkward to thread. Here is what I do. Please note: This is not adjusting it for friction, it is just loading the rope.

Opening the Akimbo as shown in the photo above, I hold it with my thumb and finger as shown in the next two photos below.


From the open position, I bring the rope into the top bollard opening; directionally, I am threading the rope away from my body (see next photo below)

then I bring the tail back towards me into the bottom bollard opening (see photo below).

Now, all that is required is to close the Akimbo, slide it up the rope and you are ready to clip in and go. Quick and simple.

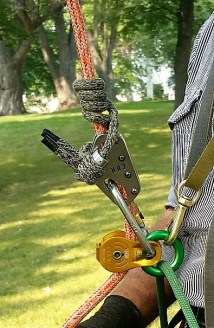
Rope Runner Pro: The new kid on the block.

I wasn’t pleased with the first-generation Rope Runner due to factors it possessed that didn’t suit me personally. I didn’t like how it felt in the hand; i.e., sharp straight edges with big bolts sticking out all over. In addition, the first gen Rope Runner had parts you had to take off, hold and reinstall if redirecting in the tree. The possibility of dropping those small parts was too great. I have already mentioned overuse injuries, Overuse Injuries and the Necessity of Working Smart, and the limitations with my hands.
All of my concerns about the first gen RR were resolved in this new version. And, so far, I am VERY impressed. It has no parts that need to be removed for line installation. It has three slick pins that are retracted but not removed entirely so nothing to drop. Everything can be done while it is still clipped to your bridge. It also works well on every rope I have tried to date. It is a big tool and, I believe, it is particularly great for trees requiring big movement.

Use of these versatile multicenders allows accessing tree canopies with minimal shock-loading of tie-in-points IF set up and used correctly. Each of these tools has specific handling characteristics and idiosyncrasies that need to be learned for safe use. As with all tools of the trade, read the manuals carefully and, remember, start off low and slow when becoming familiar with new devices and learning new techniques.
Proper Water management

By Sylvia McNeill © 2020 McNeill’s Tree Service
Proper water management is important for maximizing a tree’s potential its entire life. It is especially critical during the establishment period after transplanting. The big problem is knowing how much is enough and how much is too much. Unfortunately, there is no simple answer. Watering appropriately is as much dependent on your soil and your climate as it is on the species of plant you are watering.
Information on water requirements for a tree are often on the plant tag at the nursery. If not, a quick google search will bring up innumerable resources to provide this information.
Factors you need to know about your soil include: how fast the soil takes in water (infiltration rate), how fast it will drain (percolation rate) and how much water it holds (water holding capacity). These factors are determined by the texture of the soil (sand, silt and clay) as well as the amount of organic matter but can be confounded by compaction, common in the built environment.
Climatic factors include evapotranspiration. This is a combination of how much water is evaporating into the air from the soil and how much water is transpired from the tree itself. Humidity, temperature and wind all have a role as well.
Whereas a tree may become drought tolerant with age, young trees (remember they just had a bunch of roots cut off) need help even if they are considered a “drought tolerant” species. However, “drought tolerant” does not mean you never have to water. You will often see recommendations state “water until established” but if you live in an area with minimal rainfall, you may very well be watering every week Mother Nature doesn’t supply enough for that particular plant. The general guideline for an establishment period is one year for every diameter inch of trunk.
Some guidelines state 2 to 10 gallons of water per diameter inch of tree per week during establishment, transitioning to one inch of water per week in absence of rainfall.
Timing: You want to irrigate at a time when the water has the best chance to penetrate the soil prior to evaporating into the air. For a lot of us, that probably means early morning. If you water late in the evening and are in a warm, humid climate, this could promote fungal disease. Of course, if you are in a warm, wet and humid environment you probably aren’t augmenting irrigation and you STILL have issues with fungal diseases. At any rate, avoid watering in the heat of the day, especially if it is windy and you are using overhead sprinklers as you will lose a lot of water to evaporation.
Method: Overhead sprinkler systems are typically considered the least efficient due to the conditions I just stated in the above paragraph. Soaker hose systems delivery water in fairly precise manners but can be problematical for lateral distribution. Drip irrigation is favored by many but, I must confess, I am not a fan. It puts a measured amount in a specific area rather than full coverage of the root zone. And when it comes to trees, all too often the drip system is installed when the tree is initially planted…and never moved. (See photo below). Another problem with drip systems, or any system that is buried, is if they are not monitored and maintained, malfunctions are only noticed when the plant is stressed and/or dying.

If you are watering a garden, be it flowers or vegetables, a handheld, long-necked wand can minimize evaporation while allowing you to get precisely as much water you need, exactly where you need it.
Whatever method you choose, the entire root zone of the plant needs to be irrigated. A lawn needs the entire area watered. With trees the root zone goes far beyond the drip line. In maintaining small perennial shrubs, you may be able to get away with a drip system.
How much and how often: Water deeply and less often. This is one of those recommendations that is good most of the time. However, the texture of your soil (sand, silt and clay) will have a say in this matter. The premise for watering deeply is to encourage deep rooting of any and all your plants, including turf grass. If your soil is very sandy, you have to water more often and less at a time in order to keep the soil moist as the water will drain fast. If you have a nice loam (that ‘perfect’ combination of sand, silt and clay), you may incorporate the once a week and deeply regimen, i.e., the inch per week in absence of rainfall guideline. If you have heavy clay, you are going to water less often to allow the water time to percolate down through the soil profile.
How do you determine how much water you are applying? If you are using overhead sprinklers, the old tuna can trick is great: they have straight sides and are approximately 1″ tall. Get several (empty) cans and distribute them randomly in the area being watered. Water for 20 minutes. Measure the water in each can then add those totals together. Now divide that result by the number of cans used. Take that number, which is the average, and multiply by 3 to see how much water you would be putting down in an hour.
It is a good idea to check your soil prior to watering to be sure it needs it as well as the day after watering to see how far the water actually penetrated. Adjust your timing and amounts accordingly.
Stationary Rope System (SRS) Components

By David McNeill © 2020 McNeill’s Tree Service
As mentioned in my blog, Tools of the Trade, I now climb using Stationary Rope Technique (SRT) with very rarely utilizing Moving Rope Technique (MRT). This blog will describe the components within my system.
A quick note on terminology: the technique is the style of climbing, the system is the combination of components used.
My preference is to keep things simple while maintaining a high level of efficiency, so the system I typically use is comprised of: a multicender, a knee ascender and a foot ascender. I generally use one of two multicenders. The other components are constants in the system.
The multicenders: Hitch Hiker 2 (HH2), pictured below on the left, is compact, rugged and does not bend the line to achieve friction. It is the only multicender that can do this. It is midline attachable. I will use this tool for the bigger, gnarly trees. The rope I prefer with the HH2 is the Samson Vortex 12.7 mm although the Yale, 11.7 mm, a good all-around rope, can also be used. The other multicender I use is the Akimbo, pictured below on the right. It is very efficient, compact and also midline attachable. I tend to use this on small to medium trees or trees with complex redirect requirements as it is easy and fast getting on and off the rope with no parts to drop. My preferred rope for the Akimbo is Yale, 11.7 mm.

Harness: TreeMotion Super Light (S. Light) with Petzl torse chest harness (shown in picture below). The TreeMotion is the best all around saddle and the light version’s waist belt buckle is easily cinched tight. This can be a big deal when varying weather requires different layers of clothing as the adjustment on most saddles can be a pain in the neck.
The Petzl torse, also shown in the picture below, has a single buckle that is fast to adjust, is a minimalist chest harness and gets the job done. It doesn’t cut into your shoulders or restrict movement.

Boots: Arbpro II, Clip-and-Step. A good climbing boot. Having the Clip-and-Step allows you to do away with the foot loop on a knee ascender, which is much better.
The knee ascender: HAAS Velox Ascent System – compact, self-contained, clip version (no foot loop). The foot ascender is Climbing Technology’s Foot Ascender which functions perfectly. The boots, knee and foot ascender may be seen in the picture below.

An SRS that suits you personally, allows an ascent that is smooth, minimizing bounce and, therefore, does not shock load your tie in point (TIP). It becomes as effortless as climbing a ladder.
Tools of the Trade

David McNeill
This is not intended to be a comprehensive list of all the tools available in arboriculture. Frankly, that would be well beyond the scope of this blog. Nor is it intended to be a comprehensive history of the development and progression of arboriculture, although there will be some necessary retrospective explanations.
This is intended to introduce and/or discuss tools I have come across that made a significant impression and changed my ability to climb for the better. I have found these tools to have merit whether I continued to use them long term or not. I will reiterate: these are my opinions only.
When first learning to climb in the 1960s, we used ropes and saddles, not a lot of extensive equipment. Ascent was performed often by foot-locking, a technique that used upper body and leg strength and the coordination of capturing both legs of the rope between your feet. A skilled climber could ascend a tree very quickly.
Another technique was hip-thrusting, using a great deal of upper body strength. Both of these systems were used on a doubled rope; that is a single length of rope, thrown over a branch close to the trunk of the tree with both legs of the rope coming down to the ground. In hip-thrusting, one leg of the rope was attached to the climbing saddle and the other leg was captured to the first leg with a knot that allowed you to ascend and descend. That was called Doubled Rope Technique (DdRT). Some people have confused the term thinking it meant two ropes were used. That is not the case. This technique is now referred to as Moving Rope Technique (MRT). Friction hitch knots were typically used in MRT for ascent and descent.
It was during this time period, over a span of 40 years, my overuse injuries occurred. Day-after-day of ascending trees primarily using the arms and shoulders, handling the (heavier) chainsaws of that era in the trees took a heavy toll on my body.
There came a realization that I might have to give up climbing, a profession I had spent my entire life pursuing and loving. Then innovative arborists started coming out with new tools. Tools that allowed the use of the large leg muscles rather than focusing on the upper body. A main difference, and it was a big one, was these tools allowed the rope to stay stationary as opposed to moving as you advanced or descended the tree. This new-to-arboriculture technique is referred to as Stationary Rope Technique (SRT).
In MRT, the rope actually moves, meaning among other things, you need to stay aware of how it is moving, if it is getting caught up in brush causing the climber to become trapped in the tree, and it is possible to run out of rope coming out of the tree. With SRT the rope stays stationary. YOU move up and down the rope.
These new tools utilize SRT. For me, there was definitely a learning curve as I had spent over 40 years climbing in a specific manner, so muscle memory was strong. The new technique required some counter intuitive movements for me. But once I mastered them, there was no turning back.
These new tools were termed multicenders because they allowed you to go up and down the single rope without the use of knots, although some have been developed which do utilize knots. They also allow lateral movement throughout the tree for limb walking, some being more adaptable than others. The development of a variety of these tools has allowed a greater acceptance and utilization by climbers around the world.
The first multicender I tried out in 2007 was the Unicender (pictured below) designed by Morgan Thompson. This tool was fully mechanical, which I believe was actually a stalling point for wide spread acceptance by the climbing community. They were accustomed to working with knots.

When the Hitch Hiker (HH) came my way, I anticipated a greater acceptance from the climbing world as this tool utilized familiar knots. Invented and produced by Paul Cox, it wasn’t long before he produced a new generation edition, the Hitch Hiker 2 (HH2). To this day, it remains my “go to” climbing tool. (Pictured below)

There have been many fine tools developed since the HH2, but I found the ones that worked best for me. In certain situations, I will use the Akimbo (pictured below) developed by Jaime Merritt.

I will be discussing the full system I typically use in an upcoming blog.
© 2020 McNeill’s Tree Service
overuse injuries; the necessity of working smart
Recently, within the last year, my husband, David, started playing the transverse flute. For those not familiar with musical instruments, that refers to flutes held horizontal to the body. I know, most are probably thinking “aren’t all flutes held horizontal to the body?” Which is a discussion better held at another time.
Now everyone is wondering why on Earth I am writing a post on musical instruments on our blog page dedicated to the climbing arborist. As stated, David is an arborist, specifically a climber. With over 50 years of climbing and working in residential tree care, overuse injuries have compounded and taken their toll. Cortisone shots in knees are delaying the, perhaps, inevitable replacement(s). Self-physical therapy exercises are buying time on the shoulders. X-rays show the hips are still pretty good. But the hands and elbows were seriously damaged.
December 2018 and January 2019 saw carpal tunnel surgery in both hands and ulna nerve surgery for both elbows. Whereas these may sound somewhat innocuous, the nerve damage, particularly in the right arm and hand were extensive and may never recover. The surgery at least arrested further deterioration of the nerves, which is good.
The most significant improvement was seen fairly quickly in the elbows where the surgeries were able to restore the ability to bend his arms without the circulation in his hands being virtually shut down within 5 minutes, resulting in complete loss of feeling and use. This made it impossible for him to play a transverse flute and, as you can imagine, had significant ramifications at work.
Nerves take a very long time to regenerate, if they can, and the surgeons said to “give it 2 years” before determining final outcome.
How bad was the damage? He has no feeling in the last three fingers of his right hand to the point he cannot tell if he is putting his entire hand in a pocket or not without looking. When it is cold, it is that much worse. As in one of those quirks of nature, even though the fingers and hands are numb, cold intensifies the pain. The hands, particularly the right hand, become non-functional.
Remember he is a climber. Consider just how important it is to be able to tie a knot, handle your saw and other equipment, feel the rope, grasp a limb. Has this limited the work we are able to accept? Of course, it has. With no desire to become another dismal statistic on someone’s tree accident report, we are extremely discretionary on the work we now accept.
Where am I going with sharing this information? What I see and hear from young climbers and tree workers, and this refers mostly to the male species, is the confident attitude they can “muscle through anything”. It feels good to strain the muscles and perform strong feats. Yes, I know it does. But “working smart” does not mean “wimping out”. Try to find a tree worker/climber who has been climbing for over 10 years that isn’t living on pain killers, let alone one who have made it 20, 30 years or beyond. They all have the aches and pains from overuse injuries to go with the physical toll this profession demands.
But is that physical toll still mandatory? Many go to bucket trucks or mechanical lifts to lessen their physical output. But you shouldn’t wait until physical limitations dictate a change nor is it mandatory to give up climbing. The only reason David is still climbing is due to the innovations created by Stationary Rope Technique (SRT) systems. This style gained popularity and acceptance as the new climbing tools, referred to as multicenders, were developed. The new climbing techniques are more ergonomically sound. Using these tools correctly, it is possible to avoid many of the overuse injuries accepted as the norm in the past. These newer techniques utilize the large leg muscles as opposed to relying solely on the arms and shoulders.
For the young, up-and-coming climbers out there, it is not necessary to learn the “old way” first and graduate to the new. Start off correctly, safely and save your body for the long haul. War stories about injuries and subsequent surgeries shouldn’t be a goal in arboriculture.

© 2020 McNeill’s Tree Service